
SMTP Relay with Office 365 is one of the more common questions we get at Synergy Technical. It seems there is some confusion about what actually constitutes a relay, so let’s start off with trying to determine if you actually need to relay with Office 365 and then we’ll get into the options. The question you must ask yourself to determine if you really need a relay is:
Do my applications, scanners, etc need to send ONLY to people in my domain?
If the answer is Yes, then you don’t need a relay server. You can configure those applications/devices to send mail directly to your MX record in Office 365. No authentication is necessary, no special ports are necessary. When the mail comes into Office 365 in this scenario, it will be accepted like other messages from the Internet. Granted it will look a little strange to Forefront that mail is coming from the Internet with a source address of @yourdomain.com, but by adding the IP address(es) of the on premise devices sending mail to the safe senders list, you should be able to avoid those messages going to junk or getting quarantined.
If the answer to the question above is No, your application or device needs to send mail to both people on the Internet and in your domain, then you need to relay mail. The question then becomes how to do it.
Requirements for Relay with Office 365
The sending application must connect to the Office 365 servers on port 587
The sending application must support TLS
The sending application must authenticate with Office 365
The account you authenticate to the relay server with must be the same account as the from address on the messages you send through the relay.
And if those requirements aren’t strict enough, an account is limited to sending 1500 messages per day. So it’s pretty clear that Microsoft does not want you sending mass mailings using Office 365.
So let’s walk through a couple scenarios. Let’s say all your applications / devices meet those requirements. That would then mean that you need to create an Office 365 account for each of those devices (if you wanted the From address on the message to be unique) or you could create a single account, with a generic name, which each application could then use to authenticate and send mail as. In the shared account scenario you would just need to make sure the volume of mail per day does not exceed 1500 messages.
What we have found is that in most cases the existing applications don’t meet all those criteria or you need to send a higher volume of mail per day, so you then have to look at a couple other options.
Install a local IIS SMTP relay server
Use STunnel to allow a device or application which doesn’t support #1 and #2 in the requirements list above (Connect on Port 587 with TLS) , to connect to an on premise server over port 25. STunnel acts as bridge for applications that don’t support TLS and/or connecting on port 587.
Installing a Local IIS SMTP Relay Server
If you install a local IIS SMTP Relay Server, it will be able to route mail to Office 365 or other destinations, such as hotmail.com, microsoft.com, etc. Mail to domains not hosted on Office 365 will be delivered directly from the IIS SMTP server to the final destination, it will not pass through the Office 365 SMTP servers. Once installed you’ll be able to configure all your applications, scanners, etc to use this server without authenticating.
You can install the SMTP Service on Windows 2008 by opening Server Manager. The SMTP Service is a Feature which can be added. Once the IIS SMTP service is installed, you’ll need to modify a few default settings. The SMTP Service is administered by opening the Internet Information Services 6.0 Manager application in the Administrative Tools.
Configuring the Local IIS SMTP Server
First you’ll need to open the Properties of the Default Virtual Server. From there go to the Access tab, and click the Relay button.
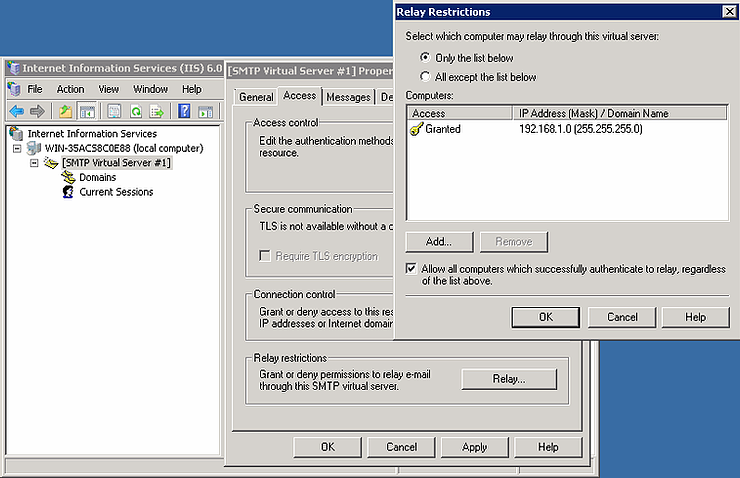
You’ll need to enter the IP addresses of the hosts that you want to relay.
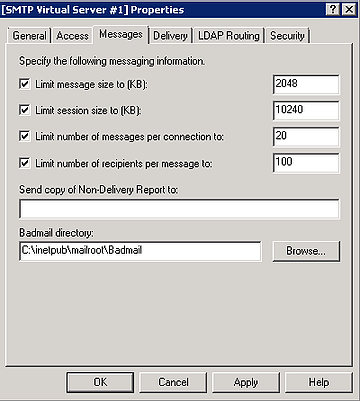
Next click on the Messages tab and review the maximum message size, the default of 2 MB might be too small.
The final setting you’ll likely want to review is the Advanced Delivery options, which can be found on the Delivery Tab, and then clicking the Advanced button.
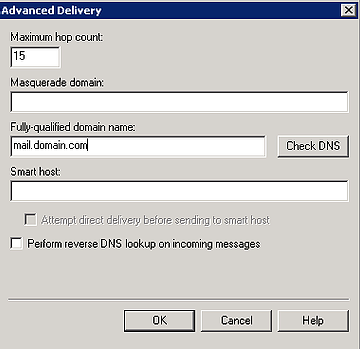
Here you specify the host name that will be advertised when this server connects to the remote hosts. It’s best practice to have the IP address of the mail server resolve to this hostname when a reverse lookup is performed on the IP. You can also configure a smarthost on this page that all outgoing mail will be sent through.
At this point, the IIS server is ready to send mail, but there are a few more things you’ll probably want to do to help ensure that messages sent through the server don’t get flagged as spam.
-
Ensure the IIS server can connect to remote mail servers over port 25. It doesn’t need to accept incoming connections, it just needs to be able to connect to remote hosts on port 25.
-
Ensure the IP address that the IIS server is sending from has a PTR record created in the external DNS. If you are unsure what the external IP of your mail server is, send a test message to an external account and look at the message headers to determine the IP Addresses. Then use nslookup to query the IP to see if there is a reverse record for it. As mentioned earlier, its best practice to have the IP resolve to the name configured in Advanced Delivery Options.
-
Update your SPF record to include the IP address of the new IIS server.
Once you have these settings configured, you should be able to test your new relay server. When sending to remote hosts during your testing, check out the message headers to make sure the SPF record is working properly and your messages aren’t being rejected or marked with a high Spam score.
4. Add the IIS server IP address to the allow list in Office 365.
Using STunnel to Allow Non SSL SMTP Clients to Connect to Office 365
In some cases your applications or devices don’t support the requirements for connecting to Office 365 using SSL or on the non standard SMTP port of 587. If you have applications which don’t support these requirements, but you would like to use the Office 365 SMTP and POP3 servers, you can use Stunnel to bridge the gap.
Stunnel listens for non-SSL connections and converts them to SSL or TLS connections. This allows you to configure your applications to connect without using SSL to the stunnel service, and then stunnel builds an encrypted tunnel to the Office 365 POP3 or SMTP services.
You can install stunnel on a server or workstation in your environment and configure your devices which don’t support TLS or POP3 over SSL to connect through that server to Office 365.
Configuring Stunnel for Office 365
Getting stunnel up and running is pretty straight forward.
Step 1 – Install stunnel
You can download the stunnel Windows binaries from http://www.stunnel.org/download/binaries.html
After downloading and installing the exe, you will likely want to configure it to run as a service. To do that, go to Start->All Programs->stunnel->Service Install.
Step 2 – Configure the stunnel configuration file
You can download a preconfigured configuration file here.
The configuration file looks like:
# Stunnel configuration file for Office 365 SMTP and POP3
# Author: Syntechva, www.syntechva.com
# GLOBAL OPTIONS
client = yes
output = stunnel-log.txt
debug=4
taskbar=yes
# SERVICE-LEVEL OPTIONS
[POP3 Incoming]
accept = 110
connect = pod51008.outlook.com:995
[SMTP Outgoing]
protocol = smtp
accept = 25
connect = pod51008.outlook.com:587
What this configuration file does is tells stunnel to listen or ports 110 and 25 and it then redirects connections on those ports to the appropriate SSL ports.
You will need to modify a few settings in the file.
First, you will need to get the server names for your account. To obtain SMTP settings information, follow these steps:
Sign in to Outlook Web App.
Click Options, and then click See All Options.
Click Account, click My Account, and then in the Account Information area, click Settings for POP, IMAP, and SMTP access. See image below.
Second, you may want to remove the POP3 Section of the file. If you are only using SMTP, then you don’t need the POP3 section.
Third, if you only want it to listen on a specific IP address, change the accept statement to something like:
accept = 127.0.0.1:25
After the file has been modified, replace the existing stunnel.conf in the Program Files\stunnel directory with the new one.
Finally start the stunnel service.
Step 3 – Verify the stunnel is listening for connections
To verify that stunnel is running, open a command prompt and run:
Netstat –an |more
What you should see is the service listening on port 25 and 110 as shown below.
(Note that in this case it’s listening on all IP addresses, not just 127.0.0.1)

Step 4 – Test your application
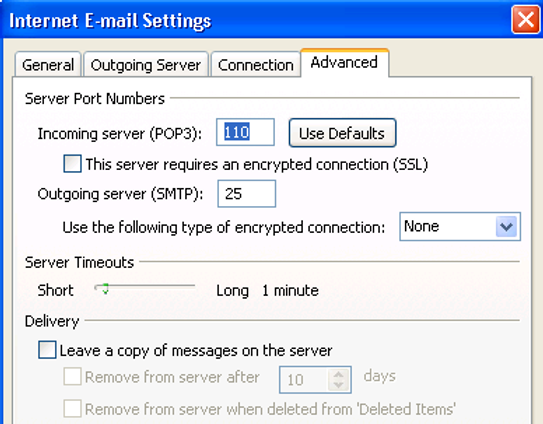
The final step is to test your application. You’ll see that in this example we are configuring Outlook to connect via POP3. So Outlook is configured to connect to POP3 on localhost on port 110 and port 25 is used to send mail. When Outlook connects, stunnel establishes the connection with Office 365 over the encrypted channel.
The one thing to keep in mind with sending via SMTP is you still have to authenticate if you want to use the Office 365 servers. It seems most applications and devices support SMTP authentication, the part they typically don’t support is TLS. Using this you can use devices that don’t support TLS with Office 365.
As always, if you have any questions or would like assistance, contact us at support@syntechva.com.
Would you like to find out more about Office 365? Learn how you can transform the way you work with Office 365 today.
Comments